Friday, October 16, 2015

Resistance Training for Rowing

Resistance training for rowers Personal Training Clifton

Rowers often look towards the gym to give them the edge over rivals. While training competitive rowers over the last 15 years and have found a number of specific resistance exercises very useful. Resistance training alone wont make a champion rower but when used correctly it will improve your performance in the boat.

 Rowing stands alone from other sports in a number of unique ways. The high demands placed on the muscular system by nearly recruiting every muscle in the body in a repetitive action while using dynamic and static components throughout the stroke. Unlike most other sports that require bipedal locomotion (Running and swimming), In rowing both the lower and upper limbs produce force in the same action at the same time. Therefore rowing has some specific needs from a well-designed  resistance programme.

In my opinion and experience the most important factor for improvement at a sport is to practise the sport. Most of your training should be on the water; resistance training should range from a minimum of two weekly sessions with a maximum of four or five sessions depending on your competition level and how much time you can put into training.

Stay away from split workout programmes. Focus on total body works when training for rowing. Training the nervous system is highly specific. Isolating body parts as seen in many traditional weight-training exercises will adapt the nervous system to be more efficient at isolated movement. If you train the nervous system to isolate individual muscle groups it will decrease its ability to coordinate muscle groups into complex movements such as jumping or throwing a ball. Using compound exercises will train the nervous system to coordinate between multiple muscle groups and to achieve a greater number of complex movement patterns. This closely resembles the athletic demands placed on our coordination during rowing.

Over the last 15 years training competitive rowers from club to international level I have made some changes to existing exercises and found some specific techniques .The exercises below are a small selection and not the only exercises I would recommend, they are not to be used as a standalone programme. I take each athlete as an individual case and design a specific periodised programme depending on their abilities, weaknesses and goals.

Before commencing any of these exercises seek clearance from a medical practitioner.
                                                                                        
Barbell Front Squat
The squat is one of the prime exercise patterns for rowing.  From the catch phase the drive is initiated by the rectus femoris (One of the Quads) The hamstrings and gluteus maximus work as pelvic stabilises during the drive. The start of the drive phase is where the greatest increase in power output is seen during stoke. Both squats and the drive phase activate similar muscles.  

Back Squat vs Front Squat.

Which is better back or front Squat?  Although the main advantage with the back squat for rowers is an increase in maximal lift compare to the front squat. I would choose front squat over back squat for most rowers. I have found though experience there is an increased danger of lower back injuries for some rowers during the back squat. 

This is due to the repetitive natural of the sport creating muscular imbalances. Because of the muscle groups used during the rowing stroke two changes to posture can be seen, forward hip tilt and lower back lordosis ( Tight lower parapinals, tight hip flexor and weak hamstrings). With some of the rowers I have trained there has been an imbalance between the lower paraspinals (Lower back muscles on the sides of the spine) and the gluteals. With an increase in strength of a muscle group you often see a shortening of that group. When the lower paraspinals become stronger and shorter they can contribute towards lordosis (excessive inward curvature of the lower spine).

 During the back squat loading though the lumber vertebra is huge. Lumber lordosis changes the loading away from the body of the vertebra toward the spinal cord. It can also results in a difference in the thickness between the front and back parts of the intervertebral disc (wedge affect). The front squat has a more upright trunk position during the lift. This can decrease the curve from lordosis and improve the loading on the lower spine.


(Source: Excelsiorgroup. Image by Unknown)

Starting Position
Feet should be between hip and shoulder width apart, toes forward and slightly outward. Keep elbows high, eyes on the horizon and the chest up. Move with hips first then knees. Squat as if sitting into a chair, keeping the abdominals strong.  Breathe in as you descend.


Finishing Position
Stop decent if the heels start to rise or the pelvis tilts backward. How deep you go depends on your flexibility, lifting experience and form.   Then drive up to starting position, keep chest up and eyes above horizon. Breathe out as you rise up using a valsalva maneuver. (Don’t hold your breath during all exercises). Repeat depending on rep range.


Dumbbell High Pull
Often an Olympic style exercise is used during a power phase of the resistance programme for competitive rowers. In most cases it will be the power clean. Great exercise but it has some limitations when used by rowers. For a start if you are using an Olympic bar on the ground the starting position is quite high. Therefore it will produce a limited flexion of the legs and torso. Flexion of these joints is greatest during the start of catch phase. 
(Source: www.carlosdinares.com. Image by Unknown)

The greatest need for power production is in the earliest stages of the rowing stroke.  (As you can see in t graph 1). The trouble with using power cleans on the ground is you miss the early position with the greatest flexion in the lower body

Graph 1.
Handle force and handle velocity versus power for a rowing stroke. Figure from Dr. Valery Kleshnev’s Rowing Biomechanics Newsletter March 2014
I introduced a stable box so the deep catch position can be copied by the starting position of an Olympic lift. Using a box will place a greater demand on flexibility so you might have to work on the depth and start with a lighter load. I also prefer the high pull Olympic lift over a power clean because in the power clean the catch of the bar has little use to a rower. You can use an Olympic bar or dumbbell for high pulls. In this case I went with dumbbells because they increase the demands on stability during the exercise.

Starting Position
Stand on a stable box or step. Feet should be a similar spacing as in the rowing position, toes forward and slightly outward. Standing with back rigid and flat or slightly arched. Eyes on horizon. Simultaneously fully extend the lower extremity joints and quickly shrug shoulders. Pull arms as high as possible. Aim for the armpits with the dumbbells.


Finishing Position
After the lower body has fully extended and the dumbbells reached near maximal height, control the dumbbells back down to starting position and repeat depending on rep range.


Bent-over dumbbell Row
Towards of the end of the drive phase the rower engages scapular adduction and elbow extension.  There are several row style exercises you can do in the gym to activate the same muscle group involved in the phase. I see the prone row used in a lot of rowing programmes it has its limitations. Preforming the exercise on a bench decreases the range of motion and cuts out the most important part of the exercise.  The last 20% of the range of motion (ROM) should focus on scapular adduction.  I prefer to use bent over dumbbell row because you a get a greater ROM and you also get an integration between the legs, core and shoulder complex.

Starting position
Start with feet shoulder with apart. Hold the dumbbells with a neutral grip shoulder width apart. Bend at the hips while keeping the back and neck in a neutral position. Hold dumbbells just above knees.


Up-phase
Pull Dumbbells up toward stomach while keeping your elbows close to your sides. Draw shoulder blades together at the top of the exercise.

Down Phase
Slowly lower dumbbells to starting position.


Seated Double Cable Row
The seated cable row is another great common exercise in a rowing programme. The seated cable row is a similar exercise to the bent over dumbbell row with a focus on the later phase of the drive.  I started using double cable seated row with rowers to be even more specific to a sculling technique. With the individual cables you can mimic the part of the phase before you start with recovery. Another change to the traditional technique of a seated row I use is a reach forward like the catch phase and back extension as you pull the cables back. Again you are integrating the different muscle groups together similar to the rowing stroke.

Starting Phase
Sit with a slight bend in your knees. Reach forward with two D handles to the starting position similar to the catch position of a rowing stroke.


Pull Phase
Pull Cables toward stomach while keeping your elbows close to your sides. Draw shoulder blades together at the top of the exercise. Then with control return to the starting position.


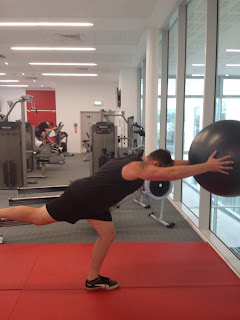
Swissball Rollout
The two contact points for force production of the rowing stroke are the feet and the hands. The bum doesn't count because the seat moves. The middle of these two points is the core (torso). Newton's Third Law, For every action, there is an equal and opposite reaction. You push with your legs and pull with your arms. With rowing, force travels from the legs into the boat and from your upper body into the oars which drive the boat forward in the water.  Your body’s ability to transfer this force as economically as possible will increase the amount of force you can apply and give you speed on the water. A strong core (torso) is essential for this process.

The swissball rollout is a great core exercise producing high demands on core strength and stability. I like the way it integrates the hip and shoulder complexes into the exercise.


Starting Point
Knee on a swissball in front of a bench.  Keep back and neck in a neutral position throughout the exercise. Start with knees bent and hands or elbows on the bench depending on your experience with this type of training.


Rollout Phase
Roll the swissball out with you knees while keeping your neck and spine in neutral position. Limit the range of motion when you start. Increase the distance you roll the ball as you become more confident with the exercise. Swissball rollouts are demanding, if you feel pain in the lower back limit the range. Slow return to the starting position.


Richard Leonard BSc Sports and Exercise Science
Personal Trainer
M: 07511468490
Web: Personal Training Clifton
E: rlbodytrainer@gmail.com
Facebook: https://www.facebook.com/rlbodytrainer

Twitter: @LesmillsPT

Wednesday, September 16, 2015

The Ultimate Shoulder Endurance Exercise

personal training clifton

The ShoulderBurner.


One of my favourite #bootcamp creations.

Total body training focusing on shoulder endurance, core (torso stability) and the #cardiovascular system.

Can be performed indoors or outdoors. You will need 10m of clear space to run.

Dumbbell weight 70 to 80%rep max. 


Standing Shoulder Dumbbell press
Standing with slight bend in knees core switched on, chest up, eyes on horizon. Breathe in on the way down out as you press up. Elbows slightly forward as you bring dumbbells down.

Fit Ball Run
Run/jog with fit ball above head. Slight bend in elbows, core switched on, chest up, eyes on horizon.

Start;

Standing shoulder dumbbell press

  1. 1min Then 20m run with fit ball above head.
  2. Next, 45sec shoulder press 40m run with fit ball
  3. Next, 30sec shoulder press 60m run with fit ball
  4. Last, 15sec shoulder press 80m run with fit ball.


Done.

Personal Training Clifton
www.rlbodytrainer.co.uk

Thursday, August 27, 2015

Hengrove Bootcamp

Hengrove Bootcamp

Moday 730pm
Tuesday 930am
Thursday 645am
Thursday 930am

All over body workouts using a large range of exercise

Resistance training
Shuttles
Yoga
Core and Abbs
Functional Body weight exercise
Boxing


Personal Trainer
M: 07511468490
E: rlbodytrainer@gmail.com
Facebook: https://www.facebook.com/rlbodytrainer
Twitter: @LesmillsPT

Tuesday, August 4, 2015

How does Leptin contribute to an increase in bodyfat

Personal Training Clifton


Personal Training bristol

The relationship between Leptin and weight management.

We consume an average of 1 million calories per year. What is amazing is we have a 99.6% accuracy balancing energy in (food) and energy out (exercise, living). The bad news is the more we train the more we eat. After 2 years 70% to 95% of people studied return to their starting weight.

 We use a fat regulating system involving the hormone Leptin. Leptin is released by fat cells and has been shown to decrease apatite. So.. the more fat we have the less we want to eat? unfortunately its not so simple. It looks like Leptin insensitivity has a greater effect on weight gain. Research is limited around this topic but it looks like genes, lifestyle factors and diet could effect the bodies sensitivity to leptin. Our bodies could be fooled into gaining body fat to increase leptin levels.

 Some studies I looked at suggested a link between refined sugars, artificial sugars and fructose (fruit sugars) with a increase in Leptin insensitivity and therefore possible weight gain. Its looking like our genes have a greater play in deciding who has a weight battle and who can have a six pack and eat pies.

 The bottom line is..at this point in time your genes are mapped out, how you choose to deal with them is up to you.Personally I love been fit and fairly healthy. So concentrate on your health; exercise regularly, eat healthy and enjoy life.


Remember one pint is equal to 40mins of brisk walking so space your pubs apart. ;-)

Personal Trainer
M: 07511468490
E: rlbodytrainer@gmail.com
Twitter: @LesmillsPT

Monday, July 27, 2015

Time to get off the couch

Time to get off the couch. To receive benefits to your health from exercise the recommend weekly activity is 75mins vigorous exercise (Hiit, spin, boxing, Running etc) or 150mins moderate exercise (walking) per week. Research has found that if you exercise more then the recommended amounts the health benefits won't increase proportionally to the amount of exercise. In other words the curve begins to flatten out. This doesn't mean you shouldn't workout more then recommend. We like to train for other reasons like it's fun or we enjoy the challenge. What is scary is in the UK only 6% of males and 3% of females reach this weekly target. The age of the sloth is well and truly here. Research has also found inactivity has the same effect as smoking 20 cigarettes per day on your health. One study found. A fit obese person has 1/2 chance of dying in the next decade then a healthy weight category unfit person. We seem to be obsessed with weight loss when in reality we should be focusing on activity first. Two high intensity classes a week is all you need or just over a 20mins of walking each day. Will help improve your quality of life and help save the NHS. 'You can do it'

Thursday, May 14, 2015

Resistance Training For Netball

Athletes have used resistance training for over half a century now to improve their sporting performance. From weekend warriorette to professional netball player a well-designed gym based resistance programme will improve your physical attributes and decrease the chance of injury.

With a combination of skills such as running, jumping, throwing and catching, netball places great demands on the body. With these physical demands there are also risks. During the 2014 season netball had the second highest amount of ACC injury claims behind rugby union. The most common injury site was the ankle, followed by the knee. The focus of a good training programme must be to address the physical demands and decrease the rate of injury of any sport.

Resistance training will give the greatest benefit to explosive speed (power) and agility on the netball court. Traditionally the two main techniques used to increase power in the gym are strength training (resistance training) and speed training (plyometrics and Olympic lifts).

Strength training focuses on increasing an athlete’s force production therefore in the equation, power equals forces X distance / the time, and an increase in force = an increase in power. The main drawback with this type of training is increasing force generally means increasing mass. Increasing the mass of an athlete can have a negative affect on agility and fitness around the court. Plyometrics and Olympic lifts will produce some strength improvement although their main focus is to increase the speed of producing force of the nervous system.

The nervous system is very specific, if you training using explosive movements you become more explosive. Nowadays most sport trainers use a combination of the two for optimal results. I believe combining Olympic lifts, traditional strength training and plyometrics in a movement specific programme will give the best power increases for netball.

Agility is affected by factors such as: strength, power, coordination and balance. Although the practice court is the best place to learn the skills needed to play netball the gym can help improve agility. Like all physical attributes if you want to improve agility you must force the body to adapt by placing it in an environment it finds hard to cope with. Equipment such as wobble boards and Swiss balls or using one-legged exercises will increase the demands of the nervous system and produce improvement.

Decreasing injuries must be a priority when designing a resistance programme. An injury to a key-player can mean the end of a championship title chase. Injuries to the knees and ankles are the greatest threat to netballer’s availability. Apart from increasing strength and agility the other key area is to increase the strength and use of the stabilising muscles of the lower leg joints. Stabilising muscles are used to help protect the joints of the body. Creating an unstable environment will force the muscles to work even harder and improve their ability. Although fit, agile players will put themselves at great risk they also need the physical conditioning to cope with the demands of modern netball.


The Exercise Programme

Before commencing this programme seek clearance from a medical practitioner. At least a six-week conditioning programme designed by a qualified instructor should be completed before commencing this programme.
The following programme is an example of an all-over body resistance programme focusing on the specific movement patterns of netball. The key factors are explosive power, balance and strength needed for netball. The programme is best used after completing a conditioning phase to build strength and coordination needed for the following exercises. The programme should be followed for no more than 4 weeks. After completion, seek help from a qualified instructor or personal trainer for a change of programme.

Possible periodisation programme for netball

Phase Weeks Workouts (per week) Reps Load Rest
Conditioning 4 3-4 12-8 Medium 60sec
Strength 4 3 8-6 Heavy 120sec
Specific (Peaking) 4 2-3 15-12 Medium 30sec

The above table is an example of a pre-season periodisation programme. If possible complete 16 weeks before the start of the season. You can also start this cycle any time however be careful not to over-fatigue before games. Once the season commences, try a non-linear training plan. I recommend 2 resistance workouts per week, first workout focusing on strength and the second on power.
The following programme should be completed 2-3 times per week (With at least 1 rest day between workouts). Work your resistance training around netball practice and games making sure you have time to recover before games. Core-stability training (abdominals and lower back) should be completed 2-3 days per week. A warm-up of 5-10 minutes cardio should be completed at the start of the workout. A warm-down and full body stretch session should be completed at the end.

                                                           Sets      Reps    Load            Tempo             Rest
Backward lunge on wobble board      3-4      15-12    3-6k ball      Fast              30sec
Squat jump with medicine ball           3-4      15-12    3-6 kg ball   Fast              30sec
Boxed plyometric press up                 3-4      15-12    B/weight      Fast              30sec
Alternating dumbbell bent over row  3-4       15-12    Med             Fast              30sec
Push press                                            3-4       15-12    Med              Fast              30sec


The Exercises

Do not hold your breath, breathe out on exertion. Select a load suitable for the rep range. Although the tempo is fast, maintain technique throughout exercise, once you lose your technique, STOP!

Backward lunge on wobble board with a medicine ball twist

This exercise is great for improving balance and coordination specific to netball. The nature of the exercise helps improve the stability of the ankles and knees, which are areas at risk while playing netball. Start without the wobble board if you have trouble balancing.

Starting position
Place right foot on wobble board while holding the medicine ball on your chest. Keep back and neck in neutral position and abdominals strong throughout entire lift.
Backwards lunge and side twist

Perform a backwards lunge while twisting the medicine ball to the same side as the fixed leg. Keep feet parallel and hips facing forward throughout the entire movement. Keep eyes on the horizon and the chest up throughout the exercise.

High knee and ball lift

Return to starting position, then using the same leg used in the backwards lunge, lift the knee as high as possible while maintaining a neutral back position. Press the medicine ball above your head at the same time as the knee lift. Finish rep range then swap sides.

Squat jump with medicine ball

This exercise is used to help improve jump height and explosive power. The horizontal medicine ball press is added to create the specific movement pattern found in netball. Practice the exercise first without too much intensity to master the coordination
Starting position

Feet should be between hip and shoulder width apart, toes forward and slightly outward. Keep elbows high, eyes on the horizon and the chest up. Hold the medicine ball to your chest.

Down phase

Move with hips first then knees. Squat as if sitting into a chair, keeping the abdominals strong. Stop descent if the heels start to rise or the pelvis tilts backward. Stop when the thighs are parallel to the floor.

Up phase

Explosively drive through your heels using your glutes and quads. Try for as much height as possible in the jump. At the same time press the medicine ball horizontally from your chest. Keep eyes on the horizon, abdominals strong and the chest up throughout the movement.

Boxed plyometric press up

Plyometric exercises are used to improve power and speed. This exercise focuses on those aspects while demanding a level of coordination seen in a netball pass.

Starting position
Start with hands on two Nike step boxes (or similar) slightly greater then shoulder width apart. Perform full press-ups or on knees depending on strength.

Wide placement
Keep back and neck in neutral position throughout entire press up. Stop when upper arms are parallel to the floor then return to starting position. In one movement hop down so hands are placed on the floor between the boxes.

Narrow placement

Perform a tricep press up while maintaining a neutral back and neck position. Explosively press up into the wide hand placement.

Alternating dumbbell bent over row

Although netball involves pushing movements, you have to train the back. This ensures a balance to the body and less risk of injury.

Starting position
Start with feet shoulder with apart. Hold the dumbbells with an opposing grip. Bend at the hips while keeping the back and neck in a neutral position. Start with one dumbbell close to your side and the other in the down position.

Down and up phases
While pulling one dumbbell to your side, the opposite dumbbell should be lowered. You can have some rotation through the spine but make sure you maintain a neutral back and neck position. Imagine a rod running down your spine that your torso is rotating around.

Push press

The push press comes from the Olympic lifting family of exercises. It is a great exercise for improving explosive power in movements above the head. The weight (load) used for this exercise should be greater then traditional shoulder press because of the addition of more body parts being used in the lift.

Up phase
Feet should be between hip and shoulder width apart, toes forward and slightly outward. Hold the barbell with a grip slightly to the outside of your shoulders and your elbows under your hands. Keep back and neck in neutral position and abdominals strong throughout entire lift. Start in a quarter squat position. Push the barbell up in an explosive movement using your arms, legs and calves. In this case do not lock your elbows at the top of the movement.

Down phase
Slowly lower the barbell to the starting position. Do not let gravity lower the barbell control the descent.

Personal Trainer
M: 07511468490
E: rlbodytrainer@gmail.com


Thursday, January 22, 2015

Functional Training 101

Personal Training Clifton

Personal Training Clifton

( I wrote this article for a New Zealand fitness mag in 2002 long before I had heard about training systems like crossfit. I missed that boat)

The Advantages of Doing Functional Compound Sets

We are more often looking towards the gym to help give them that edge during sports. There is also a greater desire to achieve the lean athletic look of a sportsperson, without a large increase in muscle mass as seen in bodybuilding athletes. If you want to look like an athlete then it helps to train like one. This article explains how using one technique called ‘Compound sets’ has benefits over traditional weight training, especially when the desired goal is functional performance. You might have heard of compound exercises this is where more than one joint is involved in a single movement (i.e., bench press or squat). A compound set is simply when two or more exercises are involved in a single set.

A large number of traditional weight training exercises originate from a bodybuilding background, which focuses on growth and symmetry of individual muscles or body parts. With this style of training, isolation of joints and muscle groups (i.e., bicep curl or hamstring curl) will occur. If your goal in the gym is for functional athletic performance or weight loss there are three main drawbacks with traditional weight training.

Training the nervous system is highly specific. Isolating body parts as seen in many traditional weight-training exercises will adapt the nervous system to be more efficient at isolated movement. If you train the nervous system to isolate individual muscle groups it will decrease it’s ability to coordinate muscle groups into complex movements such as jumping or throwing a ball. Using compound sets will train the nervous system to coordinate between multiple muscle groups and to achieve a greater number of complex movement patterns. This closely resembles the athletic demands placed on our coordination during sport.

Traditional weight training split programmes causes a short-term muscle imbalance within the body. Fatiguing one muscle group without fatiguing the opposing muscle group creates this muscle imbalance. Research has found the knee is more susceptible to injury if there is an imbalance between quadriceps and hamstring strength, e.g. if you train quadriceps on one day and then hamstrings another day. A well-designed compound set will work the body as a whole and is less likely to cause the body these short-term muscle imbalances.

Boxing personal Training clifton
A large number of sports require an intermittent maximal effort, which places great demands on the anaerobic system. Sports such as netball, tennis, squash and many other sports played in New Zealand require short bursts of sprinting with small rest periods in-between. The greater number of muscles being used at once means a greater amount of energy is required. Heavy load compound sets tend to be more demanding on the anaerobic system because of the larger number of muscles required to complete the exercise. When weight loss is the goal, compound sets can burn more calories for the same amount of time spent on a set. Traditional weight training exercises tend to use a smaller number of muscles during each exercise and therefore burn fewer calories.

The Training Programme

Compound sets should not be used if you have very little or no weight training experience. A six-week conditioning programme designed by a qualified instructor should be completed before introducing compound sets to your workouts. Before using compound sets, practice the individual exercises first. A range of tempos can be used during the sets. It is advised to start with slow tempos until the individual feels fully competent with the complex movements.

Follow this programme for no more than four weeks or add these compound sets to an existing programme.

Weight training 2 - 3 times per week. One day on, one day off. 2-3 days per week do cardio and core-stability (Abdominal and lower back).

Example: 4 Week programme

Sets Reps Load Rest
Week 1 2 15 Light 90
Week 2 3 12 Medium 60
Week 3 3 12 Medium 60
Week 4 4 10 Heavy 45

bootcamp personal training bristol
Compound Sets:

1. Burpee-out, Press up (Knees or Full), Burpee-in, Power-clean, Push press (Using Dumbbells)

Starting Position
Place dumbbells shoulder width apart with the handles parallel to each other.

Burpee-out.
Grip dumbbells shoulder width apart, keep back and neck in neutral position. Keep abdominals strong, burpee out to press up position

Press up.
Start press up at full position or move to knees. Keep back and neck in neutral position throughout entire press up.

Burpee-in.
If press-ups were preformed on knees return to full position. Burpee in toward barbell and adjust to starting power clean position.

Power-clean.
Feet should be between hip and shoulder width apart, toes forward and slightly outward. Standing with back rigid and flat or slightly arched. Simultaneously fully extend the lower extremity joints and quickly shrug shoulders. Pull arms as high as possible. After the lower body has fully extended and the bar reached near maximal height, pull the body under the bar by rotating arms and hands. The bar should be caught across the shoulders.


Push-press
Bend the knees slightly as if starting a squat then explosively push the dumbbells up using your calves, legs and arms. Finishing in a shoulder press position. Keep your abdominals strong throughout the movement and be careful not to hyperextend the lower back.

Finishing
While maintaining a flat back slowly flex the hips and knees and lower the dumbbells to the starting position.


2. Hang Clean, Front squat, Push Press

Starting Position
Feet should be between hip and shoulder width apart, toes forward and slightly outward. Standing with back rigid and flat or slightly arched. Bar resting slightly above knees

Hang Clean
Simultaneously fully extend the lower extremity joints and quickly shrug shoulders. Pull arms as high as possible. After the lower body has fully extended and the bar reached near maximal height, pull the body under the bar by rotating arms and hands. The bar should be caught across the shoulders.

Front Squat
Feet should be between hip and shoulder width apart, toes forward and slightly outward. Keep elbows high, eyes on the horizon and the chest up. Move with hips first then knees. Squat as if sitting into a chair, keeping the abdominals strong. Stop decent if the heels start to rise or the pelvis tilts backward. Stop when the thighs are parallel to floor.

Push press
Start push press halfway through up phase of the squat. Explosively push up the dumbbells up using calves, legs and arms. Finishing in a shoulder press position. Keep the abdominals strong throughout the movement and be careful not to hyperextend the lower back.

Finishing
While maintaining a flat back slowly flex the hips and knees and lower the dumbbells to the starting Hang clean position.


3. Backwards Lunge with barbell, High knee.


Start
Stand with barbell in finished shoulder press position. Hand position should be wider than the shoulders. Arms should be straight, do not lock out elbows (this exercise should be started with the weakest side first and the same amount of reps preformed on both sides).

Backwards Lunge
Perform a backwards lunge while keeping barbell in fixed position. Keep feet parallel and hips facing forward throughout the entire movement. Keep eyes on the horizon and the chest up throughout the exercise.

High Knee
Return to starting position. Then, using the same leg used in the backwards lunge, lift the knee as high as possible while maintaining a neutral back position.

Finishing
Once the knee has reached maximum height the cycle should then repeat by starting a backwards lunge again.

Personal Trainer
M: 07511468490
E: rlbodytrainer@gmail.com
Twitter: @LesmillsPT

Monday, December 8, 2014

Periodisation the next exercise Trend?

personal training clifton


Bootcamp personal Training Bristol
Another year has just arrived and another battle to complete those New Year’s resolutions has just begun. Most of us will have made at least one fitness goal we intend on completing. Your goal might be weight loss, weight gain or a sporting performance and this year you are looking for an edge to increase your chance of success. If you train the same way all the time your body would become accustomed to the programme and you fitness levels will plateau. One technique used by most athletes is periodisation. Periodisation is a great way to get optimum results from your training.

In the context of fitness, periodisation means changes in intensity, volume and frequency of training over a period of time. These factors are systematically structured to avoid over-training and produce greatest results. The ancient Greeks first used periodisation to prepare their athletes for the Olympics. Milo of Croton changed intensity over time by lifting a bull-calf on a daily basis until it had reached full maturity. Although this basic periodisation plan was completed by default Milo never lost a wrestling match in five consecutive Olympics. Modern periodisation wasn’t really defined until the 1970’s. This was due, at least in part, to some groundbreaking research by the noted physiologist Hans Selye, who ultimately formulated what he called the ‘general-adaptation syndrome’. According to this theory the body responds to ‘stressors’ (environmental stress) by adapting to meet the demands (it adapts by improving). When the adaptive response is reached the body stops changing until a new type of stress is introduced to produce further adaptation. Therefore periodisation introduces ever-changing stressors to produce maximum results.

Two main training philosophies are linear and non-linear periodisation. Linear periodisation generally consists of microcycles of 3-4 weeks and is completed in succession. An example of this would be hypertrophy training for 3 weeks, strength training for 3 weeks followed by power training for a further 3 weeks. This type of periodisation training is great for sports that have definable competition periods 3-4 times per year. Non-linear periodisation has dramatic changes that occur within a weeklong training cycle. An example would be Monday hypertrophy training, Wednesday strength training and Friday power training. Non-linear periodisation is best used by sports with long seasons and frequent competitions.

 Non-linear periodisation is also best used by individuals with no competition goals but physical goals such as weight loss. Researchers from Arizona State University found during a 12-week study that a non-linear trained group improved 29% (Bench press) and 56% (Leg press) compared to 14% (Bench press) and 26% (Leg press) in the linear trained group. Another advantage of non-linear periodisation is the variety in a training week, which reduces the boredom often seen in gym-based programmes. Although non-linear periodisation is best suited for the non-athlete there is nothing stopping you trying linear periodisation. Always seek help from a qualified instructor or personal trainer when designing a new programme.


High Bar Step up Personal Training clifton


The Non-linear Periodisation Programme

Before commencing this programme seek clearance from a medical practitioner. A six-week conditioning programme designed by a qualified instructor should be completed before commencing this programme.

The following programme is an example of an all-over body resistance programme. This programme is only one example of many that can utilise non-linear periodisation. The programme should be followed for no more than 4 weeks. After completion, seek help from a qualified instructor or personal trainer for a change of programme.

The non-linear periodisation plan
Workout Type Sets Reps Load Tempo Rest
1 Mass 3 12-8 Med 1,0,2 60sec
2 Strength 3 8-6 High 2,1,2 180sec
3 Endurance 4 25-20 Low 1,0,2 30sec
4 Power 3 15-12 Med 1,0,1 60sec

All four workouts should be completed in order once per week. Follow the exercises listed in the programme, change the variables listed in the table from workout to workout. All four workouts should be completed in order once per week. A warm-up of 5-10 min cardio should be completed at the start of the workout. A warm down and full body stretch session should be completed at the end. A possible workout plan could be:

Monday Workout 1
Tuesday Workout 2
Wednesday Cardio and core work
Thursday Workout 3
Friday Cardio and core work
Saturday Workout 4
Sunday Rest

The Exercises

Do not hold your breath, breath out on exertion. Select a load suitable for the rep range. Maintain technique throughout exercise, once you lose your technique stop!

1. Front Squats

Front Squat Personal Training CliftonStarting position
Feet should be between hip and shoulder width apart, toes forward and slightly outward. Keep elbows high, eyes on the horizon and the chest up. Move with hips first then knees. Squat as if sitting into a chair, keeping the abdominals strong. Stop decent if the heels start to rise or the pelvis tilts backward. Stop when the thighs are parallel to the floor.

Up phase
Drive through your heels using your glutes and quads. Keep eyes on the horizon, abdominals strong and the chest up throughout the movement. Do not lock your knees at the top of the movement.

2. Swiss ball Lunge

Start position
Place back leg flat on Swiss ball. Keep feet parallel and hips facing forward throughout the entire movement. Keep eyes on the horizon and the chest up throughout the exercise. Bend both knees simultaneously, do not let the knees travel over the toes.

Up phase
Return to starting position, finish rep range on one side then swap sides.


3. Swiss ball Chest Dumbbell Press

Starting position
Sit on Swiss ball with dumbbells on your thighs. Slowly roll down ball keeping your hips parallel with the floor. Stop when the head and neck are resting on the ball in a neutral position.

Down phase
Hold the dumbbells so your elbows are directly in-line with your hands. Keep the back and neck in a neutral position throughout the entire lift. Slowly lower the dumbbells until your arms are just past 90 degrees from your shoulders.

Up phase
Return the dumbbells to the starting position, do not lock elbows at the top of the lift.

4. One Arm Row

Starting position
Place one knee and one hand on the Swiss ball. Keep the back and neck in a neutral position. Start with the dumbbell at your side without dropping your shoulder.

Up phase
Raise the dumbbell to the side of your stomach, keeping your elbow close to your side. Do not twist your back to raise the dumbbell. Once rep range has been reached swap sides.

5. Standing Dumbbell Shoulder Press

Up phase
Feet should be between hip and shoulder width apart, toes forward and slightly outward. Hold the dumbbells slightly forward and to the outside of your shoulders. Keep the back and neck in a neutral position and abdominals strong throughout the entire lift. Press the dumbbell above your head while keeping your elbows slightly forward of your body. Do not let the dumbbells touch at the top of the movement.

Down phase
Slowly lower the dumbbells to the starting position. You control the dumbbells decent do not let gravity lower the dumbbells.

Personal Trainer
M: 07511468490
E: rlbodytrainer@gmail.com
Twitter: @LesmillsPT

Saturday, November 8, 2014

What is Human Balance?


Balance Personal Training Clifton
Balance is referred to as an individual’s ability to produce and maintain a stable posture. Although balance is not the main focus of most individuals training goals it has a great importance to everyday life. According to the ACC 2015 statistical data, falls are the most common injury in older adults. Many factors can cause the elderly to fall but the underlining cause is a lack of ability to balance. Not only can these injuries have long lasting effects, such as loss of mobility for the individual, but in some cases cause death. Most sporting situations require a degree of balance for success. Not only will increasing balance improve an athletes sporting performance but will also decrease the chance of injury caused by loss of balance during sport.

An individual’s ability to balance is affected by two main areas, sensing change in body position and the ability to affect change in body position. There are three systems used within the body to sense change in position, vestibular (inner ear), visual (eyes), and somatosensory (soma = body, sensory = sensations). The vestibular system is found in the inner ear, it senses change in motion and position of the head. The visual system provides information to the brain on the body’s position in respect to the external world. The somatosensory system is responsible for conveying sensory information from the skin, muscles and joints to the brain. All three systems are used in combination to help the body balance.

The ability to change body position, in order to maintain posture, can be controlled actively by thinking about it or passively without thought. Our bodies usually use a combination of the two. The nervous systems postural reflexes control posture passively (sub-consciously). The body’s muscles and nervous system are used to actively control body position; an example would be changing arm position when balancing on one leg.

When your goal is to improve your balance you must improve both your ability to sense change and your ability to affect change in the body’s position. There are many techniques used for improving balance such as exercising while standing on one leg or performing exercises with your eyes closed. In this article we will look at just one technique, overloading both the somatosensory system and the muscles controlling balance. To improve a physical ability you can overload (make its job harder) than normally experienced.

Balance personal Training clifton A good technique, when training for improvement in the somatosensory system, is to increase the demand on the system by making the base of support (i.e. the floor) unstable. The most common pieces of equipment used in the gym are the swiss ball or the wobble board which both work in two ways. Firstly by creating an unstable base of support making it harder for the body to sense change in position relative to the ground which then increases this system’s ability to work during normal situations. Secondly, making it harder to change the body’s position by not having a solid platform to push against, this helps to increase strength and stability of the muscles concerned with control of balance. This is especially important for older adults when lack of muscle strength is a key factor in causing falls.


personal Training Bristol
The Balance Exercises

The following exercises can be used in addition to an individual existing exercise programme. If you have any known physical or medical conditions see your doctor for clearance before commencing these exercises. If possible have a qualified instructor check your technique.

The Wobble Board

A wobble board is usually a disc shaped board with a smaller dome on the base creating an unstable platform, although they do come in many shapes and sizes. An air-filled plastic wobble board with a wooden disc for stability was used for the following example. The wobble board has been widely used by physiotherapists for rehabilitation of lower limb injuries. It can be used to help improve the nervous system and stabilizing muscles. Within gyms the wobble board has been used more and more in a range exercises such as squats, lunges and press-ups to help improve balance and create variation from traditional techniques.

Wobble board squat and one arm shoulder press is an excellent exercise for improving balance while still completing a resistance style exercise. You should do the exercise at the start of your programme when your nervous system is fresh. Because the exercise uses a large number of muscle groups it is great for warming up the entire body.

The Swiss Ball

The swiss ball is widely used for improving strength, increasing muscle tone, increasing flexibility and in this case improving balance. The same principles for improving balance with the wobble board apply to the Swiss ball.

Swiss ball balance exercises can be preformed at the start of an exercise programme to warm-up or at the end of a programme as a cool-down. Make sure there are no objects or obstructions within a falling radius that may cause injury. When you have mastered the level 1 exercise by completing 2-3 sets with good technique for 1min, move on to the next level.


Wobble board squat with one arm medicine ball shoulder press.

Starting position
Place wobble boards shoulder width apart. Use a 1-6 kg medicine ball depending on strength. Stand on wobble boards with medicine ball in left hand at shoulder level.

Down phase of the squat (left arm shoulder press)
Feet should be between hip and shoulder width apart, toes forward and slightly outward. Keep the medicine ball steady at shoulder level, eyes on the horizon and the chest up. Move with hips first then knees. Squat as if sitting into a chair, keeping the abdominals strong. Stop descent if the pelvis tilts backward or when the thighs are parallel to floor which ever comes first.

Up phase of the squat
Start the one arm shoulder press halfway through the up phase of the squat. Keep eyes on the horizon and the chest up throughout the movement. At the completion of the squat and shoulder press transfer the medicine ball to the right hand.

Down phase of the squat (right arm shoulder press)
Repeat steps taken for the left arm.

Up phase of the squat
As before, start the one arm shoulder press halfway through the up phase of the squat. Keep eyes on the horizon and the chest up throughout the movement. At the completion of the squat and shoulder press transfer the medicine ball to the left hand

Swiss ball balance exercise.

Level 1: Four point stance

Mounting the ball
Start in an open area with a flat level surface. Place knees shoulder width apart against the ball. Place hands slightly outside the line of your knees on the opposite side of the ball. Slowly transfer your weight over the ball until you are balancing on top of the ball.

Holding the exercise
You should have four-point contact with the ball using both hands and knees. Keep back and neck in neutral position during exercise. Draw bellybutton towards spine to keep abdominals strong. Hold position for up to 1 min.


Dismount
Slowly move your body weight backwards off the ball until your feet make contact with the ground.

Level 2: Three point stance

Holding the exercise
The same technique is used for mounting and dismounting the ball in three-point stance as in four-point stance. There is a difference when holding the exercise. Once four-point stance is reached, slowly raise your right arm until it is inline with your back. Keep neck and back in neutral position. Hold for half the time of the total exercise then slowly return to four-point stance and raise the left arm.

Level 3: Kneeling on the Swiss ball
Start with same technique as four-point stance. Then slowly rise up to a kneeling position with arms out parallel to the floor for balance. Keep eyes on horizon and chest up.

Level 4: Kneeling on the Swiss ball with one arm medicine ball fly
Start in the kneeling position on the Swiss ball. When you have reached a stable position with out stretched hands raise a 1kg medicine ball in front of you. Slowly move the ball in one hand out to the side until it is inline with your body then slowly move the ball back into the middle. Grab hold of the ball in the opposite hand and repeat step. Continue with movement until set is over.

Personal Trainer
M: 07511468490
E: rlbodytrainer@gmail.com
Twitter: @LesmillsPT

Thursday, April 10, 2014

What is the Bosu?


Personal Training clifton Balance Bosu
Have you wondered what the new piece of equipment, which looks like a giant blue marshmallow is all about? It’s not so simply called a ‘Bosu’, which is an acronym for "both sides up". One side is a solid platform 25 inches across, the other side is domed shaped similar to half a swiss ball. The bosu can be used with solid side down or up creating two distinctive balancing modes. This unique design makes the bosu an extremely versatile and functional piece of equipment.

 A small group of professional and Olympic teams first used prototypes of the bosu in 1999. David Weck invented the bosu when he saw a need for a safe and effective piece of equipment that challenges the users balance, core stability and pro-perception. The bosu has two unique properties. Firstly, it is very versatile you can use the bosu for many training modes such as: strength, power, cardio, rehab and core stability training. Secondly, no matter what mode of training you are performing on the bosu balance and stability will also be a factor.

The bosu works great as a platform for traditional weight training exercises. Leg exercises such as squats and deadlifts, upper body exercises such as dumbbell press and one arm rows can performed using the bosu as a base of support. Power training such as plyometrics can be performed using the bosu. Try jumping on and off the bosu at different angles not only are you performing a plyometric but the changes in angles help improve agility necessary for most sporting situations. Group fitness classes using bosu’s for cardiovascular exercise can already be found in the USA. If they haven’t already started it is only a matter of time before a class similar to step classes will be started in New Zealand. Jogging or stepping on to the bosu will give you a cardiovascular response similar to using a rebounder or stepping on to a box.

The bosu works very much the same way as a wobble board is used in rehabilitation. Standing on an unstable platform increases the amount of work the stabilizating muscles have to do to keep balance. The properceptive system (senses body’s position) also has to work a lot hard to maintain a balanced posture. Overloading these systems will in a normal situation increase their ability to function. The bosu can be used to perform many of the same core stability exercises found using a swiss ball. Because of the unique nature of the bosu, new core stability exercise can be perform such as rollout while kneeling on the bosu or bridging with elbows on the domed side. The variation of exercises and modes of training using the bosu is huge. Because of the doubled sided nature of the bosu some exercise can be made more difficult by having the dome-side facing down. An example would be performing squats on the solid-side up.

The most important factor the bosu has to offer is no matter what mode of training you perform balance and stability will also be trained at the same time. This makes the bosu a great piece of equipment for the average exercises enthusiasts to the professional athlete. The two for one deal is a great way to save time allocated towards training. With today’s busy lifestyle time set aside for training is at a premium, for example the bosu gives you the opportunity to strength train and work on stability at the same time. Sporting situations place great demands on balance and stability, exercises using the bosu gives you a more sports specific style of training. For example performing squats on a bosu not only improves strength but also places great demands on balance and stability.

If you are looking for more information on training with the bosu there are DVDs, videos and books found on the Internet at sites such as www.amazom.com. If you do not have access to a bosu, try the larger sporting retail stores. Prices range around $170.00.


The Exercises

The following exercises can be used in addition to an individual existing exercise programme. Before commencing any exercise seek clearance from a medical practitioner. If possible have a qualified instructor check your technique.

Do not hold your breath, breathe out on exertion. Maintain a neutral spine position and switch on your inner core on before starting exercises. Maintain technique throughout exercise, once you lose your technique -stop! Make sure you perform all exercises in a cleared area with no chance of contacting objects during falls.

The following exercises are not to be used as a programme; they are merely an example of verity of different exercise modes that the bosu can be used.


1. Bosu Squats (Strength training)
Bosu squats can be performed with a barbell, dumbbells, medicine balls or simply body weight. A great exercise for strengthening the back and lower limbs. The nature of the exercise places greater demands on muscle stability and balance compared to traditional squats. Performing bosu squats with curved side down increases the difficultly of the exercise.

Starting position
Feet should be width apart, toes forward and slightly outward. Keep elbows directly under the bar, eyes on the horizon and the chest up. Move with hips first then knees.

Down phase
Squat as if sitting into a chair, keeping the abdominals strong. Stop decent if you start to lose your balance or the pelvis tilts backward. Stop when the thighs are parallel to floor.

Up phase
Drive through your heels using your glutes and quads. Keep eyes on the horizon, abdominals strong and the chest up throughout the movement. Do not lock your knees at the top of the movement.

2. Alternating M/ball Bosu press (Power training)
Mixing elements of power and stability training this exercise can be very demanding. This exercise will increase upper body (chest) power when performed with explosive speed. The nature of the exercise will help increase coordination and stability of the upper body.

Starting position
Place two bosu’s just greater then shoulder width apart. Start with the medicine ball next to the left hand bosu. You can perform full press-ups or start on your knees depending on your training experience. Place your left hand on the medicine ball and your right hand on the bosu to the right.

Down and up phase
Perform a press up until your upper arms are parallel to the floor. As you come up to the starting position move your left hand first by rolling the medicine ball to the bosu on the right. Then place your left hand on the bosu on the left. As you do this place your right hand on the medicine ball next the bosu on the right. Repeat steps on opposite sides until rep range has been reached.

3. One-legged balance (Balance/Rehab training)
This is a joint stability and balance exercise. A one-legged balance exercise is usually performed for rehabilitation of the lower limbs, hips or lower back. Because the bosu produces an unstable platform, this exercise helps increase stability of the ankles, knees and hips. When performing rehabilitation exercises always seek guidance from a qualified professional.

Starting and finishing position
Place one foot on the centre of the bosu. Slowly step up and raise the opposite foot slightly of the bosu by bending your knee. Try to keep your hips level with each other. Keep your eyes on the horizon and the chest up throughout entire exercise. Hold this position for 10-20 sec or until you lose balance. Repeat with opposite side. Always start with weaker side first.

4. Rollouts on Bosu (Core stability training)
Rollouts on a bosu will place demands on balance and inner core strength. This exercise highlights the need to have a strong integration between the inner core and the thorax muscles, which in turn, are linked to our legs and arms.

Starting position
Kneel on a bosu while placing both arms in the middle of a swiss ball, which is about half a metre away. Maintain a neutral back and neck position at all times throughout the entire exercise.

Finishing position
Slowly roll the swiss ball away from the bosu. Maintain a neutral back and neck position at all times throughout the entire exercise. Make sure your forearms are in contact with the S/balls and your inner core muscles are switched on. As your increase in core strength increase the distance your roll the swiss ball away. Slowly return to starting position.

Personal Trainer
M: 07511468490
E: rlbodytrainer@gmail.com
Twitter: @LesmillsPT